WClarke and Samsara, CC BY-SA 4.0 https://creativecommons.org/licenses/by-sa/4.0, via Wikimedia Commons
Introduction
Photography is the art and science of capturing light. At its core, every photograph is a delicate balance of three fundamental elements that determine how much light reaches your camera’s sensor (or film): aperture, shutter speed, and ISO.
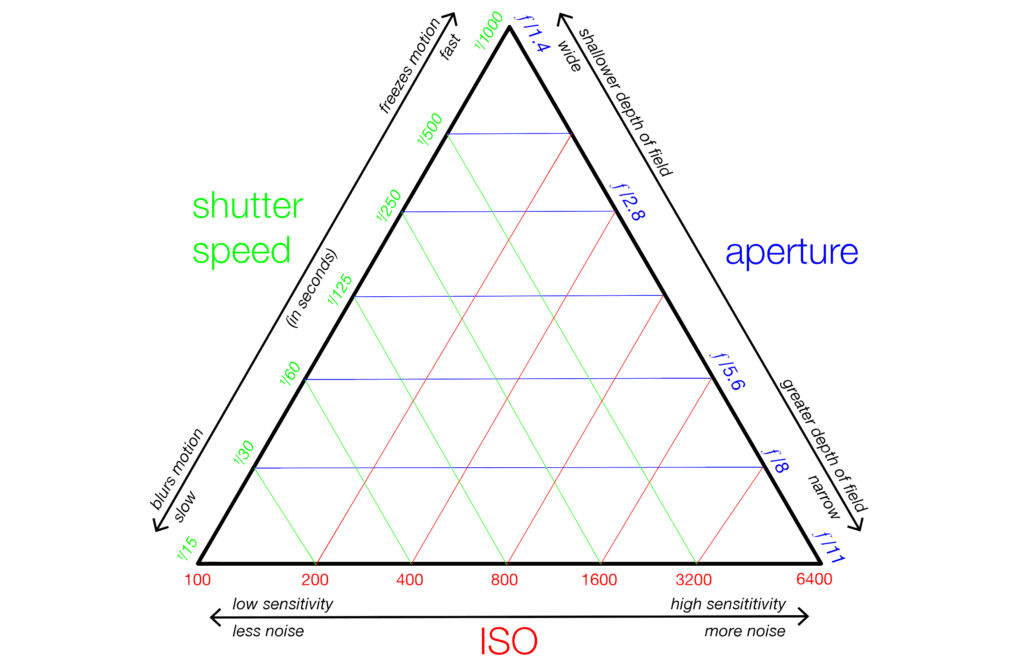
Together, these three settings form what photographers call the “Exposure Triangle.” Mastering this concept is essential for moving beyond automatic mode and taking creative control of your photography.
Learning to master the exposure triangle is the fastest way to unlock professional-looking photos and move beyond auto mode. Whether you’re shooting for Instagram, your portfolio website, or just personal creativity, understanding aperture, shutter speed, and ISO gives you the flexibility to handle any lighting scenario—indoors or out.
This guide covers the essential manual camera settings every beginner should know, and shows you how the exposure triangle applies to modern DSLRs, mirrorless cameras, and even many smartphones.
Whether you’re shooting landscapes, portraits, or action photography, understanding the exposure triangle will help you achieve the perfect exposure while maintaining creative control over your images.
What is the Exposure Triangle?
The exposure triangle refers to the relationship between three camera settings that determine the exposure of a photograph:
- Aperture – The size of the opening in the lens
- Shutter Speed – How long the camera’s sensor is exposed to light
- ISO – The sensitivity of the camera’s sensor to light
Each of these elements controls exposure in different ways, and they all work together to create a properly exposed image. When you adjust one element, you typically need to adjust at least one of the others to maintain the same exposure level.
Think of the exposure triangle as a balanced scale. If you change one element, you need to compensate by changing another to keep the balance (proper exposure). This relationship gives photographers tremendous flexibility in achieving the desired creative effects while maintaining proper exposure.
Each side of the triangle plays a crucial role: aperture affects depth of field and bokeh, shutter speed controls motion blur or freeze, and ISO manages digital noise.
When you adjust one setting, you must balance the others to keep your image properly exposed—this is true for everything from landscape photography to night shots or fast action at sports events. Mastering the exposure triangle means always having the right exposure, regardless of your subject or shooting conditions.
Aperture: Controlling Light and Depth
What is Aperture?
Aperture refers to the adjustable opening inside your lens that controls how much light passes through to the camera’s sensor. It’s measured in f-stops (like f/2.8, f/4, f/8, f/16), with smaller f-stop numbers representing larger openings.
Imagine your camera lens as a window with adjustable blinds. A wide-open aperture (small f-number like f/1.8) is like having the blinds completely open, allowing maximum light to flow through. A narrow aperture (large f-number like f/16) is like closing those blinds significantly, restricting the amount of light.
Aperture is a key ingredient for creative effects—wide apertures (f/1.8–f/2.8) create stunning background blur for portraits (perfect for social media headshots or Instagram bokeh). Narrow apertures (f/8–f/16) ensure sharpness across the frame, ideal for landscape and architecture shots shared on websites or print. Understanding how aperture influences depth of field lets you guide your viewer’s eye and create professional-quality images.
How to Set Aperture on Your Camera
On most DSLR and mirrorless cameras, you can control aperture by:
- Aperture Priority Mode (A or Av): Set your desired aperture, and the camera automatically selects an appropriate shutter speed.
- Manual Mode (M): You set both aperture and shutter speed independently.
- Program Mode (P): The camera suggests aperture/shutter speed combinations, but you can shift between different combinations.
On most cameras, you adjust the aperture using a dial or control wheel. Check your camera’s manual for specific instructions, as controls vary by manufacturer and model.
Pro tip: For beginners, start in Aperture Priority mode and experiment with different f-stops to see how your images change. This is also the easiest way to get pro-level portraits and food photography shots for your website or social feeds.
The Creative Effects of Aperture: Depth of Field
Beyond controlling light, aperture is the primary tool for adjusting depth of field (DoF) – the zone of acceptable sharpness in your image from foreground to background.
- Wide aperture (small f-number, e.g., f/1.8): Creates a shallow depth of field, which means your subject is in sharp focus while the background becomes pleasantly blurred (bokeh). This is ideal for portraits, where you want to isolate your subject.
- Narrow aperture (large f-number, e.g., f/16): Creates a deep depth of field, keeping more of the scene in focus from foreground to background. This is perfect for landscape photography, where you typically want everything from the foreground flowers to the distant mountains in focus.
Many photographers use a shallow depth of field for artistic Instagram posts or profile pictures. For travel bloggers or landscape shooters, a deep depth of field (high f-number) is essential for crisp, detailed scenic photos that look great on Pinterest or print.
Pro tip: Think of aperture values like fractions – f/2 is larger than f/16, just like 1/2 is larger than 1/16. This helps remember that smaller f-numbers mean larger openings.
Shutter Speed: Controlling Light and Motion
What is Shutter Speed?
Shutter speed refers to how long your camera’s shutter remains open, exposing the sensor to light. It’s measured in seconds or fractions of a second (like 1/60, 1/250, 1 second, 30 seconds).
Think of shutter speed as how quickly you blink your eyes. A fast shutter speed (like 1/1000) is like blinking very quickly – you’re only letting light in for a tiny moment. A slow shutter speed (like 1/15 or several seconds) is like keeping your eyes open for an extended period, allowing more light to enter.
How to Set Shutter Speed on Your Camera
You can control shutter speed by:
- Shutter Priority Mode (S or Tv): You set the shutter speed, and the camera selects an appropriate aperture.
- Manual Mode (M): You set both shutter speed and aperture independently.
Most cameras have a main dial to adjust shutter speed. In viewfinders or on screens, shutter speeds are often displayed as whole numbers (like 125, 250, 500) which actually represent fractions of a second (1/125, 1/250, 1/500).
The Creative Effects of Shutter Speed: Capturing or Freezing Motion
Beyond exposure control, shutter speed determines how motion is captured:
- Fast shutter speed (e.g., 1/1000 sec): Freezes motion, capturing crisp images of fast-moving subjects like sports players, wildlife, or splashing water.
- Slow shutter speed (e.g., 1/15 sec or slower): Records motion as blur, which can be used creatively to convey movement in waterfalls, light trails from cars, or the smooth flow of clouds across the sky.
- Very slow shutter speed (several seconds or minutes): Creates dramatic effects like star trails or smooths out moving water into a silky texture.
Handheld shooting tip: To avoid camera shake when hand-holding your camera, use a shutter speed that’s at least 1/[focal length] of your lens. For example, with a 50mm lens, try not to go slower than 1/50 sec without stabilization. For extra sharpness, use even faster speeds.
Understanding shutter speed is crucial for freezing motion—whether you’re shooting sports, wildlife, or energetic kids. Fast shutter speeds are a must for action or pet photography, while slow speeds allow for creative motion blur (like waterfalls or night light trails). Experimenting with shutter speed is how you get tack-sharp images for your website or creative blur effects for social media.
ISO: Controlling Sensitivity and Noise
What is ISO?
ISO determines how sensitive your camera’s sensor is to light. It’s measured in numbers like 100, 400, 800, 3200, etc. Higher ISO numbers mean greater sensitivity to light, which helps in darker environments.
A helpful metaphor is to think of ISO as your skin’s sensitivity to sunlight. Lower ISO (like 100 or 200) is like having less sensitive skin – you need more sunlight (more light in the scene) to make an impression. Higher ISO (like 3200 or 6400) is like having very sensitive skin – even a small amount of light makes a strong impression.
How to Set ISO on Your Camera
On most modern cameras:
- Look for a dedicated ISO button, or find it in your camera’s quick menu.
- Many cameras have Auto ISO, which lets the camera adjust sensitivity based on available light while you control aperture and/or shutter speed.
- In manual mode, you’ll typically set ISO explicitly along with aperture and shutter speed.
The Creative Impact of ISO: Digital Noise
The primary side effect of increasing ISO is digital noise – those grainy or speckled artifacts that reduce image quality. This is similar to film grain in analog photography, though digital noise is generally considered less aesthetically pleasing.
- Low ISO (100-400): Produces the cleanest images with minimal noise, ideal when you have plenty of light or can use a tripod for longer exposures.
- Medium ISO (800-1600): A good compromise when you need more sensitivity with manageable noise levels.
- High ISO (3200+): Enables shooting in low light conditions but introduces noticeable noise, especially in shadows. Modern cameras handle high ISOs much better than older models, but there’s always some quality degradation.
Modern digital cameras and even smartphones now handle higher ISO settings much better, so don’t be afraid to raise your ISO when shooting at night, indoors, or at events. Learning when to use low ISO for clean, print-quality images, and when to push high ISO for those candid, low-light moments is a core skill for both beginner and advanced photographers.
Film ISO vs. Digital ISO: Historical Context and Modern Flexibility
The Fixed World of Film ISO
In the film era, ISO (or ASA as it was previously called) was a fixed property of the film itself. When you loaded a roll of film, you were committed to that specific ISO rating for all 24 or 36 exposures.
- Film ISO characteristics: Each film stock had unique characteristics beyond sensitivity – Kodak Portra 400 looked different from Fuji Superia 400, with distinct grain structures, color rendition, and contrast.
- Push/pull processing: Photographers could “push” film by shooting at a higher ISO than rated and then compensating during development, but this was a technical process with quality trade-offs.
- Planning ahead: Photographers often carried multiple cameras with different film stocks or had to change film mid-shoot, which required careful planning.
The Dynamic World of Digital ISO
Modern digital cameras allow you to change ISO from shot to shot – a remarkable flexibility that film photographers could only dream about.
- Shot-by-shot adjustment: You can shoot one image at ISO 100 for a clean landscape, then immediately switch to ISO 3200 for a dimly lit indoor scene.
- Auto ISO: Modern cameras can automatically adjust ISO while maintaining your creative choices for aperture and shutter speed.
- Electronic noise: Unlike the often aesthetically pleasing grain of high ISO film, digital noise tends to manifest as electronic artifacts, color shifts, and reduced dynamic range.
- Processing advances: Modern cameras and post-processing software have dramatically improved high ISO performance, with noise reduction algorithms that preserve detail while reducing artifacts.
Today’s digital ISO flexibility is a game-changer for event, wedding, or travel photographers—switching from a low ISO for outdoor scenes to high ISO for indoor receptions, all with one camera.
The flexibility of digital ISO is one of the most significant advantages of modern digital cameras over film, completely transforming how photographers approach challenging lighting conditions.
How The Triangle Elements Work Together: Finding the Perfect Balance
Understanding how aperture, shutter speed, and ISO interact is crucial for achieving both proper exposure and your creative vision. Let’s explore this relationship in depth.
The Fundamental Relationship
In simple terms, these three settings control exposure with the following relationship:
- Aperture: Controls amount of light entering the lens
- Shutter Speed: Controls duration of light exposure
- ISO: Controls sensitivity to the available light
When you adjust one element, you need to compensate with one or both of the others to maintain the same exposure. For instance, if you change your aperture from f/4 to f/5.6 (reducing light by half), you’ll need to either:
- Double your shutter time (e.g., from 1/250 to 1/125 second)
- Double your ISO (e.g., from 400 to 800)
- Use some combination of both adjustments
A balanced exposure triangle ensures your photos are never too dark or blown out, even when the light is tricky. This is the foundation for consistent results, whether you’re shooting RAW for post-processing or sharing straight out of camera to your blog or Instagram story.
Stops of Light: The Common Currency
The exposure triangle is unified by the concept of “stops” of light. One stop represents either doubling or halving the amount of light. Each element of the triangle can be adjusted in stops or fractions of stops.
Aperture stops (each step halves/doubles the light):
- f/1.4 → f/2 → f/2.8 → f/4 → f/5.6 → f/8 → f/11 → f/16 → f/22
Shutter speed stops (each step halves/doubles the exposure time):
- 1/1000 → 1/500 → 1/250 → 1/125 → 1/60 → 1/30 → 1/15 → 1/8 → 1/4 → 1/2 → 1 second
ISO stops (each step doubles/halves the sensitivity):
- 100 → 200 → 400 → 800 → 1600 → 3200 → 6400
This common currency of “stops” allows you to trade settings while maintaining the same exposure. If you open the aperture by one stop (letting in twice as much light), you can either:
- Make the shutter speed one stop faster (half the time)
- Reduce the ISO by one stop (half the sensitivity)
Inside the “Stops of Light: The Common Currency” section:
One stop represents a doubling or halving of light, no matter whether it’s aperture, shutter speed, or ISO. This guide explains it in more depth.
Understanding “stops” is vital for anyone who wants to use manual settings or follow advanced photography tutorials. Stops are the language of exposure—learning to think in stops helps you quickly adjust for changing light at events, outdoor portraits, or landscape photo shoots.
The Creative Decision Matrix
The true power of understanding the exposure triangle lies in making informed creative decisions. Here’s how to approach different scenarios:
Scenario 1: Shooting a Portrait
Creative goal: Sharp subject with blurred background Priority setting: Aperture (wide, e.g., f/1.8 or f/2.8) Adjustment strategy:
- Set your aperture for desired depth of field
- Choose the lowest ISO for clean image quality
- Set shutter speed to properly expose (while staying above the minimum handheld speed)
Scenario 2: Capturing Sports Action
Creative goal: Freeze fast movement Priority setting: Shutter speed (fast, e.g., 1/1000 or faster) Adjustment strategy:
- Set your shutter speed fast enough to freeze motion
- Choose an appropriate aperture for sufficient depth of field
- Increase ISO as needed to maintain proper exposure
Scenario 3: Landscape Photography
Creative goal: Maximum scene sharpness from foreground to background Priority setting: Aperture (narrow, e.g., f/11 or f/16) Adjustment strategy:
- Set aperture for desired depth of field
- Keep ISO low (100-400) for maximum quality
- Use slower shutter speed with tripod to maintain exposure
Practical Trade-offs in Different Scenarios
Each scenario presents its own challenges and requires different trade-offs:
Low Light Situations
When shooting in dim conditions, you’re often forced to compromise:
- Option 1: Use a wide aperture (low f-number)
- Pros: Lets in more light, keeps ISO lower
- Cons: Very shallow depth of field, potentially partial subject sharpness
- Option 2: Slow down shutter speed
- Pros: Keeps ISO lower for better image quality
- Cons: Risk of motion blur from subject movement or camera shake
- Option 3: Increase ISO
- Pros: Maintains desired aperture and shutter speed
- Cons: Introduces noise, reduces dynamic range and color accuracy
Fast Action in Bright Light
When shooting sports on a sunny day:
- Challenge: Need fast shutter speed but might have too much light
- Solution options:
- Use smaller aperture (higher f-number) to reduce light
- Use lowest ISO (usually 100)
- If still overexposed, consider ND (neutral density) filters
Indoor Events without Flash
When shooting events where flash isn’t allowed:
- Challenge: Low light requires compromises
- Balanced approach:
- Moderately wide aperture (f/2.8-f/4) for reasonable depth of field
- Shutter speed around 1/60-1/125 (fast enough for minor movement)
- Increased ISO (potentially 1600-3200) to enable the above settings
Apply this creative decision-making whether you’re shooting portraits for LinkedIn, dynamic sports photos for a team website, or dreamy landscapes for wall art prints. The exposure triangle is the roadmap for getting results you can actually use and share.
Example Exposure Combinations
Below are some equivalent exposures that all let in the same amount of light but create different visual effects:
| Aperture | Shutter Speed | ISO | Visual Effect |
|---|---|---|---|
| f/2.8 | 1/1000 | 800 | Shallow DoF, frozen motion, some noise |
| f/4 | 1/500 | 800 | Medium DoF, frozen motion, some noise |
| f/5.6 | 1/250 | 800 | Deeper DoF, frozen motion, some noise |
| f/8 | 1/125 | 800 | Deep DoF, frozen most motion, some noise |
| f/2.8 | 1/250 | 200 | Shallow DoF, frozen most motion, clean image |
| f/16 | 1/30 | 800 | Very deep DoF, possible motion blur, some noise |
This table demonstrates how different combinations can achieve the same exposure while producing dramatically different images. The key is to prioritize which element matters most for your creative intent.
Having a reference chart or exposure triangle infographic handy can help beginners visualize how different settings interact. Many photographers keep a printed or digital cheat sheet in their camera bag for quick reminders during shoots.
When to Introduce Artificial Light: Flash and Speedlites
Sometimes, no combination of aperture, shutter speed, and ISO can provide a satisfactory image without significant compromises. This is when artificial lighting comes to the rescue.
Signs You Need Supplemental Light
Consider using flash or other artificial lighting when:
- Exposure settings force unacceptable compromises:
- ISO so high that noise becomes unacceptable
- Shutter speed so slow that motion blur ruins the shot
- Aperture forced wider or narrower than desired for your creative vision
- Subject is backlit and you want to balance exposure between bright background and shadowed subject
- Harsh shadows or contrast need softening in outdoor portraits
- Indoor events where ambient light creates unflattering color casts or insufficient illumination
Types of Artificial Lighting for Photographers
- Built-in flash: Convenient but produces harsh, direct light with limited power and control
- Speedlites/Speedlights: Portable flash units that offer:
- Greater power than built-in flash
- Ability to adjust flash output power
- Option to bounce flash off ceilings/walls for softer light
- Potential for off-camera placement with wireless triggers
- Studio strobes: More powerful flash units for studio settings
- Continuous lighting: LED panels, ring lights or other constant light sources
How Flash Interacts with the Exposure Triangle
When using flash, the exposure triangle becomes more complex:
- Ambient exposure (controlled by aperture, shutter speed, ISO) affects the background and overall scene
- Flash exposure (controlled by flash power, distance, and aperture) affects the illuminated subject
This creates a dual exposure system:
- Shutter speed primarily controls ambient light exposure but generally doesn’t affect flash exposure (until you reach sync speed limitations)
- Aperture affects both ambient and flash exposure
- ISO affects both ambient and flash exposure
- Flash power only affects the flash-illuminated portions
Flash Techniques to Overcome Exposure Limitations
- Fill flash: Adding just enough flash to fill shadows while preserving natural appearance
- Set exposure for background
- Add flash at reduced power (-1 to -2 stops) to illuminate shadows
- Slow sync flash: Combining flash with slower shutter speeds
- Allows background to be properly exposed in dim environments
- Subject is frozen by flash while ambient light creates atmosphere
- Can create creative motion trails with moving subjects
- Rear curtain sync: Flash fires at the end of exposure rather than beginning
- Creates more natural motion trails that follow behind moving subjects
- Gives a better sense of direction and movement
- Bounce flash: Pointing flash at ceilings or walls rather than directly at subject
- Creates softer, more flattering light
- Simulates natural light direction when bounced properly
High Speed Sync: Breaking the Sync Speed Barrier
Most cameras have a maximum flash sync speed (typically 1/200 or 1/250 second). At faster shutter speeds, the mechanical shutter can’t fully expose the sensor during the flash duration.
High Speed Sync (HSS) is an advanced flash technology that pulses the flash rapidly during exposure, allowing:
- Use of flash with fast shutter speeds (up to 1/8000 sec)
- Ability to use wider apertures for shallow depth of field even in bright conditions
- More flexibility when balancing flash with bright ambient light
The trade-off is reduced flash power and range, as the flash energy is spread across multiple pulses.
Using the exposure triangle with flash is how you balance your subject with tricky backgrounds—this technique is especially useful for night event photography, weddings, and dramatic portrait lighting. High Speed Sync (HSS) and fill flash are invaluable tools for overcoming harsh sun or low-light situations, making your shots stand out online and in print.
Practical Applications and Creative Control
Understanding the exposure triangle isn’t just technical knowledge – it’s creative power. Here are practical applications of these concepts in different photography genres:
Portrait Photography
- Wide aperture (f/1.4-f/2.8): Creates pleasing background blur (bokeh) that isolates your subject
- Moderate shutter speed (1/125-1/250): Fast enough to prevent motion blur while allowing reasonable aperture/ISO
- Low to moderate ISO: Keep as low as possible for skin tone quality
- Add flash when needed for fill light or to create specific lighting effects
Landscape Photography
- Narrow aperture (f/8-f/16): Ensures deep depth of field for sharpness throughout the scene
- Slow shutter speed (often with tripod): Allows narrow aperture while maintaining low ISO
- Low ISO (100-200): Maximizes image quality, dynamic range, and color depth
- Consider ND filters for very long exposures of moving water or clouds
Sports/Action Photography
- Fast shutter speed (1/500 or faster): Freezes motion for crisp action shots
- Mid-range aperture (often f/2.8-f/5.6): Balances light gathering with sufficient depth of field
- Variable ISO: Adjust as needed to enable fast shutter speeds, even if it means some noise
- Use flash with HSS for fill or when ambient light is insufficient
Night Photography
- Wide aperture (f/1.4-f/2.8): Gathers maximum available light
- Slow shutter speed (with tripod): Allows more light collection, creates light trails
- Variable ISO: Higher for handheld, lower for tripod work
- Consider light painting techniques with flashlights or flash
From Instagram reels to commercial websites, knowing how to control the exposure triangle allows you to create images that match your vision and stand out in today’s crowded digital world.
Conclusion: Mastery Through Practice
The exposure triangle is both simple in concept and infinitely nuanced in application. While the technical relationships between aperture, shutter speed, and ISO are fixed, the creative possibilities are endless.
True mastery comes through deliberate practice – experimenting with different combinations, analyzing the results, and developing an intuitive understanding of how these settings work together to create your photographic vision.
Start by focusing on one element at a time. Learn how aperture affects depth of field, how shutter speed captures or freezes motion, and how ISO impacts image quality. Then begin exploring how adjusting multiple elements creates different effects while maintaining proper exposure.
Remember, the “correct” exposure is ultimately the one that expresses your creative intent. Sometimes a technically “imperfect” exposure – one that’s dramatically dark or intentionally bright – may be exactly what tells your story best.
Photography is both technical and artistic. The exposure triangle is your fundamental tool for translating what you see and feel into the image you share with the world.
Frequently Asked Questions
Exposure Triangle FAQ: Beginner & Pro Answers
What is the exposure triangle in photography?
The exposure triangle is a foundational photography concept that refers to the relationship between aperture, shutter speed, and ISO—three camera settings that work together to control the amount of light reaching your sensor. Mastering the exposure triangle is essential for taking manual control and achieving the desired creative effect in your photos.
How do aperture, shutter speed, and ISO affect a photo?
Aperture controls the amount of light entering the lens and affects depth of field (background blur). Shutter speed determines how long light hits the sensor and whether motion is frozen or blurred. ISO sets the sensor’s sensitivity, impacting brightness and digital noise. Adjusting these settings helps you balance exposure and achieve sharp, creative, or low-light images.
What is a “stop” in photography exposure?
A “stop” is a unit of measurement indicating a doubling or halving of light. Changing aperture, shutter speed, or ISO by one stop means you are letting in twice as much or half as much light. Understanding stops is key for balancing the exposure triangle, especially in changing lighting conditions.
What are the best exposure triangle settings for portraits?
For portraits, use a wide aperture (like f/1.8 or f/2.8) for soft background blur, a shutter speed of at least 1/125s to avoid motion blur, and a low ISO (100-400) for clean skin tones. Adjust as needed for light conditions—raise ISO or open aperture if indoors or in low light.
How do I avoid blurry photos using the exposure triangle?
Use a faster shutter speed to freeze motion, especially when shooting handheld or photographing moving subjects. Increase ISO or open the aperture if you need more light for a sharp image. For most lenses, keep shutter speed at or above 1/[focal length] (e.g., 1/50s for a 50mm lens).
Can I use the exposure triangle with smartphone cameras?
Yes! Many smartphones now offer manual (pro) modes where you can adjust ISO, shutter speed, and sometimes aperture. Mastering the exposure triangle applies whether you shoot on a DSLR, mirrorless, or phone.
How does flash interact with the exposure triangle?
When using flash, aperture, ISO, and shutter speed still work together, but flash primarily affects your subject while ambient light affects the background. Learn to balance flash power with the triangle for natural or creative effects, especially in low light or backlit situations.
What are common exposure triangle mistakes beginners make?
Common mistakes include using too high an ISO (causing grain/noise), too slow a shutter speed (leading to blur), or the wrong aperture (losing desired depth of field). Always review your images, check for sharpness and brightness, and experiment to learn what each setting does.
Where can I find a visual exposure triangle chart or infographic?
Many free exposure triangle diagrams are available online—try [Photography Mad’s exposure triangle guide](https://www.photographymad.com/pages/view/the-exposure-triangle) or search for “exposure triangle infographic” for printable charts and cheat sheets.
How can I practice mastering the exposure triangle?
Practice shooting the same scene at different aperture, shutter speed, and ISO settings. Use challenges from our Photography Challenge Generator for hands-on learning. Analyze how changes affect brightness, blur, and noise to build intuition and confidence.